 Got a little extra wall space? Showcase your snapshots, favorite family pictures or gotta-see-it candid shots in a great-looking family photo gallery that’s easy to change and update as your photo collection grows.
Materials:
- Gallery-style photo frames (front-loaders work best for quick updates)
- Favorite photos (5×7 and 4×6)
- Nails
- Hammer
- Tape
- Paper
Step 1:
First, start with a selection of simple gallery-style front-loading photo frames. We found two sets of 10 frames in assorted sizes (with mats) at Target which worked great for this project (total cost: $25.00). Create a professional look in your photo composition by using consistent colors and frame styling throughout — plus, this lets the photos and subjects be the center of attention, not the frames!!! Select your favorite photos and insert into frames — keeping the paper frame inserts for use in a later step.
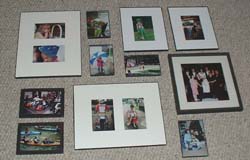
family photo gallery craft project
Step 2: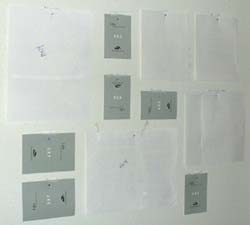
Arrange your composition on the floor or bed. Depending on the space you have to fill, let two to three large frames (8×10 or 10×13) anchor the composition, next arrange the remaining frames into the composition from largest to smallest. A gallery look is achieved by keeping consistent spacing between all frames, and aligning some while offsetting others. Remember, not every frame needs to be perfectly lined up to its neighbor. A little variety in alignment creates interest.
Step 3:
After the arrangement layout is complete, use the paper frame inserts as location markers by taping them to the wall, duplicating (or refining) your arrangement layout. (If frames do not have paper inserts, simply cut paper to size and use).
HINT: Before you tape the paper markers to the wall, mark the area for the nail hole. Do this by measuring and marking the center of the paper and the distance from the top of the frame to the hanger (or the hanging point if frames have hanging wires)
Step 4:
After finalizing frame placement with on the wall, nail hanging nails directly through the paper as marked. This way, you don’t have to mark the wall or guess nail placement.
Step 5:
Hang photos over paper makers, everything should be an exact match. Then remove frames and paper (just rip off of the nail), re-hang photos… and Enjoy!