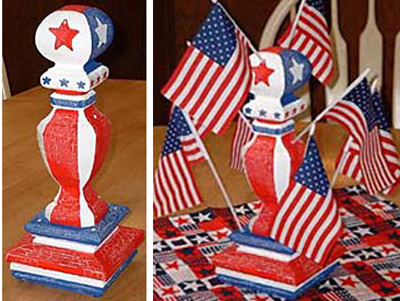
Add patriotic flair anywhere this Fourth of July with this easy flag finial project. It’s a great Fourth of July centerpiece and a truly KidSmart project that’s tough enough to handle bumps and spills from busy hands.
We made it out of decorative pre-drilled wooden post toppers from the home improvement store. And it couldn’t be easier to assemble. Just twist the pre-drilled pieces together. The bolts come with the individual pieces, how easy is that? Secure it with a little wood glue and finish with a fun paint job. We went with the classic Red, White and Blue theme for the Fourth, but an antique aged finish or a natural-base finish would look great, too!
When dry, just drill some small holes to insert the flags for a flag finial, or, just display by itself as a fun accent.
Here’s how to do it…
Materials:
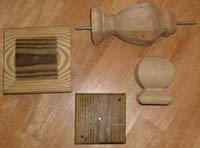
- Post toppers – we used 4 outdoor deck post toppers/finials
(these are treated for outdoor use, but fine for painting after being primed – we left them unsanded for a country look) - Water base primer (spray or brush-on)
- Acrylic craft paint in Red, White and Blue
- Craft paint special finish (we used crackle medium)
- Paintbrushes: small and medium, fine point for stars
- Drill and bits sized for the bolts in post toppers and the flag sticks
- Wood glue
- 4-8 American flags
 Step 1
Configure post toppers to suit your design. We stacked 2 square toppers for the base and topped them with two finials. Finials typically come with bolts for securing, but the square toppers may need to have a hole drilled to assemble.
Step 2
Assemble finial using wood glue between the pieces. After dry, determine where you want to insert flags and drill holes – drill them a bit larger than the flag sticks, at a angle, about .25 to .5 inch deep.
Sand if desired (we didn’t) and prime the entire finial with water-based primer and allow to dry 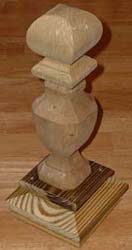 thoroughly.
Step 3
Top the primer with a full coat of white paint which will act as an undercoat for the crackled red and blue areas. Top dry white paint with crackle medium – thicker in some areas than others for uneven crackling – and let dry at least 2 hours.
Paint 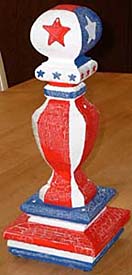 blue and red areas over the crackle medium in long strokes. Try not to stroke over wet paint to get the best crackle effect.
After paint is dry, coat with clear sealer or add a coat of antiquing stain (or thinned brown craft paint) with a cloth or sponge, working into the cracks for an aged patina – then coat wth sealer.
Add flags and display for all to enjoy!