Displaying favorite photos in padded, fabric-covered photo frames is a great kid-smart alternative to regular frames. Fabric covered frames can be made in any size or shape, in fabrics, colors and textures to suit any décor, and they can safety withstand the bumps and bonks of an active household.
Here, we’ve used our holiday wall hanging project to illustrate the basic steps for making fabric covered picture frames.
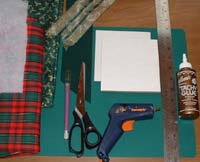
Materials:
- Sturdy, thick cardboard For each frame you’ll need 2 pieces cut to size (plus a scrap if making an easel-style tabletop frame)
- Even easier! Use inexpensive pre-cut photo mats from the craft store
Fabric
- 2 pieces about 2″ longer and wider than the final frame size, plus additional if you’re making an easel-style tabletop frame. We used 2 complementary fabrics for our holiday wall hanging project.
- Masking tape or Glue your preference — masking tape, glue sticks are great if younger kids are helping, mom may prefer hot glue
- Double-Sided Tape
- Polyfill quilt and craft batting
- Clear heavyweight plastic acetate (optional — for the “glass”)
- Scissors or craft knife
Pencil
- Ruler
- For the holiday wall hanging project or ornaments:
- Wide ribbon (we used green velveteen)
- Thin ribbon or cording if making ornament frames
Step 1 — Measure and Cut Cardboard
Measure and cut both cardboard pieces to your final frame size and shape (if using the pre-cut photo mats, just cut one piece of cardboard to the size of the mat and skip to step 3)
Step 2 – Measure and Cut Picture Window
Cut a photo window in one piece of cardboard. Remember to cut it a little smaller than the picture size (for a 4×6 photo, cut a window about 3.75 x 5.75). To center your picture window in the frame, find the middle of the cardboard by drawing an “X” from corner to corner, then measure one-half of the window’s height and width from that center point toward each side.
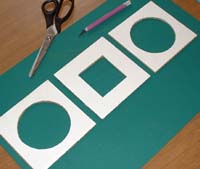
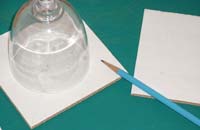
For our holiday wall hanging project we cut one square photo window and two circular photo windows – we used a glass to trace the circle — a compass works, too.
Step 3 – Cut Polyfill Batting
Cut polyfill batting to the size of your frame, leave about 1/8″ extra around the edge to slightly round the edges of the frame. Cut out the window area 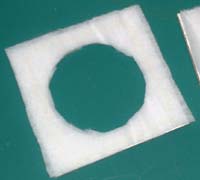
Step 4 – Cut Fabric
Lay one piece of fabric right side down and place the cut frame with batting, batting-side down, on the wrong side of the fabric. Mark and cut the window opening on the fabric, leaving ample fabric (about ¾ to 1 inch) for folding back and attaching to the frame. Also cut an angle in each corner of the fabric at the corners of the picture window (or around the circle)- cut this just short of the window so the cardboard won’t peek through when done. Also trim the outer corners leaving about 1/8″ to spare.
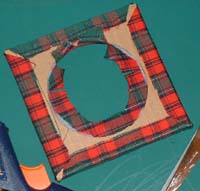
Step 5 – Attach Fabric to the Frame Window
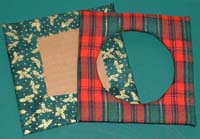
Begin on the outside, working on opposite sides one side at a time, pull the fabric around to the cardboard and tape or glue. Next, pull fabric through the window to the cardboard and tape or glue. (make sure the edges of the fabric are secured to the cardboard)
 Step 6 – Attach Fabric to the Frame Back
Lay the second piece of fabric wrong side down and place the second piece of cardboard on top. Cut the outer corners of the fabric as in Step 4. Pull the fabric around and tape or glue to cardboard as in Step 5
If you want to add embellishments to the inside or outside edges of the frame, glue these on now. Pillow cording works well, since it has a flange to attach to the frame.
 Step 7 – Attach Frame Front to Back
Attach the two fabric-covered pieces of cardboard together using glue or double-stick tape on three sides, leaving top open to insert the picture. Hint: make sure the bottom edge of the picture window has a line of tape or glue that is about 1/2″ from the window opening to keep the picture from sliding too low in the frame. See options below for adding an easel back for tabletop frames.
**Step 7 – Attach Frame Front to Back (Holiday Wall Hanging Project)
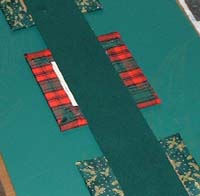
For our holiday wall hanging project we sandwiched a wide velvet ribbon between the front and back pieces of the 3 frames. This helps the frames hang better and gives a more finished look. To do this, lay the 3 frame backs on the work surface, aligned and evenly spaced – we spaced them about 2″ apart. Cut a length of ribbon leaving about 8″ extra at the top and bottom, center it across the frame backs. Glue the back of the ribbon to the inside of the frame backs.
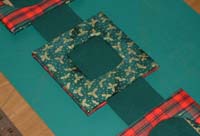
To finish the holiday wall hanging project:
1. Cut a 10″ piece of ribbon, fold the ends in to the middle and crimp to create a bow. Glue the bow to the top of the ribbon on the back side of the ribbon, leaving enough ribbon to fold to the back over the bow. Fold ribbon over the bow and glue to the back side, just below bow.
2. Cut a length of ribbon a bit longer than the main strip attached to the frames. Glue this strip to the back of the main strip at the top and at a bit of an angle. Trim the bottom of each ribbon strip, at slightly different lengths.

Other frame decorating ideas:
Easel-back Tabletop Frame: Cut a wedge-shape from scrap cardboard that is about two-thirds the height of the finished frame. Following the directions from steps 4 & 5 above, cover with fabric, leaving about an inch of extra fabric on the side that will attach to the frame. Attach the easel to the frame using glue or double-stick tape. Last, attach a small strip of fabric between the easel and frame so the easel stays in place.
Holiday Ornaments: Great gifts for grandma! Make small versions in different shapes and glue a loop of ribbon to the back to hang. This is also a fun way to track a child’s growth from year to year – just make several ornaments at once to use over the years, and insert a picture each holiday season and date the back. This will be a great keepsake collection for years to come.
Growth Chart: Modify the wall hanging idea to make a growth chart. Make several small frames and glue to a wide ribbon. Insert pictures over time and chart your child’s growth in the ribbon.

