DIY: Spice Up Your Kitchen with a Window Herb Garden
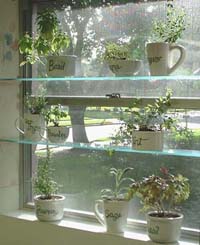 A few basic shelves and spare containers turn any sunny window into a garden spot!
Fresh herbs brighten any meal, from simple soups to gourmet dinners. But how many busy family cooks can step away from simmering pots and active kids to harvest a last-minute touch of tarragon?
Here’s a better idea. With an attractive indoor herb garden, you’ll never have to cope with working outside in the summer heat or worrying about dogs that dig up gardens. Find a sunny spot in your kitchen, add a few shelves, plant your favorites in spare mugs or bowls … and, voila! You’ll enjoy year-round herbs at your fingertips and have a beautifully dressed window as a bonus.
Materials:
 To create your window herb garden you’ll need:
- A sunny window (Most herbs like full to partial sun.)
- Two to three shelves – glass, wood or wire mesh. (The number of shelves depends upon the size of your window.)
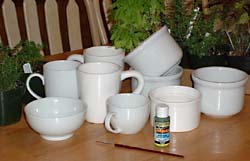
- Nine to 12 spare mugs and bowls (We used mismatched white stoneware, some old, some new, each under $3)
- Scraps of wood trim – quarter-round or similar molding at with at least 5/8-inch lip to hold shelf
- Small potted herbs or seeds from a catalog, garden shop or health food store
- Potting soil
- Glass and ceramic tile craft paint(s)
- Acrylic craft paint for wood trim
- Two pencils or other markers – in contrasting colors
- Finishing nails
- Hammer
- Sandpaper
- Countersink (A large nail works to countersink nails into the trim.)
- Level (available from the hardware store)
Step 1: Measure window and cut shelves
Many windows are inset about 4 inches to 5 inches into the wall, creating a deep sill and side jambs. These are generally framed with wood underneath the sheetrock, so you can attach the molding directly to the window jambs on the left and right of the window and inset your shelves.
If your windows are not inset into the wall, you can still add shelves, but you will need to buy brackets to install on either side of the window. These shelves will not be inset into the window opening; instead, they will be in front.
Measure your window opening’s height, width and depth and determine where to place your shelves. Space shelves about 10 to 12 inches apart and make sure they are placed out of the reach of young children. For inset shelves, cut your shelves to the full opening depth, and ¼” shorter than the width.
Shelves can be made of wood (painted or covered in shelf paper), glass or sturdy wire mesh. To create an airy greenhouse look, we used ¼” shelf glass in our window herb garden. If you use glass, be sure to ask the glasscutter how much weight your shelf will safely hold when cut to size, and request finished shelf edges. If your neighborhood hardware store cannot help with this, buy your glass from a glass shop or picture-framing store that can.
Step 2: Cut molding for shelf bracket
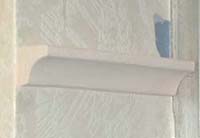
Cut two pieces of molding for each shelf to the full depth measurement. Sand edges and paint with acrylic craft paint to match or contrast with the window frame
Step 3: Measure shelf heights and attach molding to the first side.
On one side of the window opening, mark where the bottom of the lowest shelf will sit. Measure the distance between that mark and the bottom windowsill.
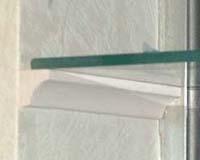
Use three of the finishing nails to attach one piece of molding just under that mark. Starting at the center point of the molding, drive the first nail through the molding and into the window frame. Use a small level to ensure the molding has no tilt (rotate the molding as needed to straighten). Then finish this part of the step by driving each remaining nail halfway between the center nail and the end of the molding piece.
Use a countersink (or a large nail) to push the nail heads slightly beneath the surface of the molding. Cover each nail head with a dab of paint.
 Step 4: Level the first shelf and attach molding to the other side
On the other side of the window, mark the same molding height, but beware: that mark will be only a rough guide. Despite appearances most windows are not exactly square, so you can’t count on measuring up from the bottom to guide you to the right height to attach your shelf. But you can overcome any house’s quirks by using a level.
It works like this: now that molding is up on one side, lay the shelf in place with a level on top and adjust the height of the shelf’s free end, above or below the mark you’ve made until your level lets you know that the shelf is perfectly square. Then make a final mark for the bottom of the shelf. Attach the opposite molding at that mark, the same way you did on the first side.
Repeat this step with each piece of molding then set your shelves in place.
 Step 5: Paint containers
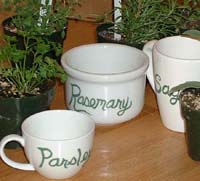
If you want, you can use a little paint to pull together the look of a mismatched set of mugs and bowls. On our KidSmartLiving herb garden, we simply labeled each container with the name of each herb using ceramic/glass paint in sage green – but the sky’s the limit on what you can do! Ceramic paint dries quickly and can be permanently set by baking in an oven for 30 minutes; see the manufacturer’s instructions for details.
Step 6: Plant herbs or seeds
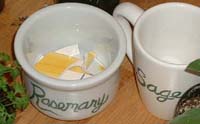
Drop a few rocks or pottery shards in the bottom of each container, this allows for some drainage without having to drill holes in the containers, then plant your garden.
Step 7: Enjoy!
Arrange your new plants on your shelves and enjoy your new garden!