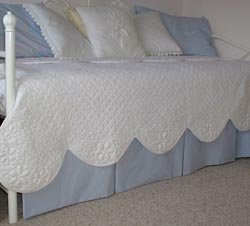
Easy DIY Daybed Dust Ruffle Decorating Project
 We bought a white iron daybed for my then-three-year-old daughter’s “big girl bed.” Daybeds are decorative and functional choices in kids’ rooms for many reasons. First, without the trundle unit underneath, daybeds provide ample out-of-the-way storage for children’s toys, etc. Second, as children get older, adding the trundle unit provides stow-able bed space for sleepovers or family guests. Third, daybed designs grow well with kids – by decorating with bolsters and pillows, a daybed becomes a settee-style couch perfect for “grown-up” gatherings in teenagers’ rooms.
When decorating our new “big girl bed,” rather than using a traditionally daybed dust ruffle, I opted for a more functional design. We used Velcro to attach one tailored panel to the front bedspring rail, which stretches the full length of the bed. This easily removable panel makes retrieving playtime toy baskets a cinch and makes changing the sheets, washing the bed skirt — and later on using the trundle unit — simple tasks.
This bed skirt is an easy and inexpensive home decorating project, and can even be made without sewing a stitch! This idea works well for all bed skirt styles, from flat-panel (best for no-sew), to pleated or gathered. For our skirt, we chose a tailored panel with three pleats (sewing required). We note no-sew tips in the instructions below.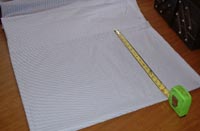
Materials
- Fabric (a poly/cotton blend resists wrinkling better than 100% cotton)
About 2-1/2 yards will be long enough for a flat panel bed skirt for a standard twin daybed
About 4 yards is needed for a gathered or pleated bed skirt, depending on the number of pleats or amount of gathering.
Hint: I used a king-sized sheet, inexpensive and plenty of scrap material to make coordinating pillows, frames and other decorative touches. - 2-1/2 yards Velcro
- Sticky-back hook tape for the bedrail and sewable loop tape for the skirt
- Scissors
- Straight pins
- For sewing project: Sewing Thread
- For no-sew project: 5/8″ Heat-n-Bond Ultrahold fabric adhesive for turning edges under and adhering velcro home
Step 1
Measure the length of the daybed front rail and the height from the floor to the top edge of the rail.
Add 1-1/2 inches to these measurements for a flat panel style, (add more to the length for a pleated or gathered skirt.)
For gathered or pleated projects, cut an additional 3″ strip the length of the bedspring rail, adding 1/2″ to turn under at either end.
Step 2
Measure and cut the fabric to suit your project
Step 3: Build the Bed Skirt
For Sewn Bed Skirts:
Hem the bottom edge with a rolled hem (fold over and press raw edge ¼” and fold again and hem about ¼”). Or you can doubl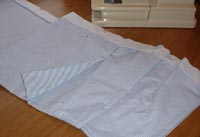 e the fabric with cut ends at the top for a bed skirt with extra body (this is what we did) and then you have no hem stitch showing.
Gathered skirt: Run a basting stitch the length of your fabric ½” from the top edge and gather.
Pleated Skirt: Fold, baste and iron your pleat(s) to set the crease.
Finish the top edge with the 3″ strip. Stitch the strip to the skirt, right sides together, about 1″ from the top of the bed skirt. Press the raw edge to allow a ¼” finished edge. Turn, pin and stitch from the right side in the gutter — just under the sewn edge of the strip (or topstitch if this is easier)
For a No-Sew Bed Skirt:
Cut workable lengths of 5/8″ Ultra Heat-n-Bond (about 2-3 feet works well), following the iron setting instructions, apply Heat-n-Bond to all edges of the bed skirt. Peel off the paper backing, fold edges under and press again to finish all edges.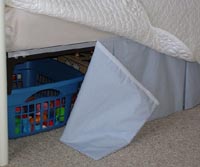
Finish with the Velcro loop tape:
Hold up your finished bed skirt to the bed to determine the right placement for the Velcro hook tape. The skirt should just brush the floor, but not puddle.
Sewn: Pin and stitch the loop tape to the back of the top band. For a topstitch look, run two lines of stitches from the right side, about 1/8″ from the top and bottom of the band (far enough to catch the velcro) or, for a no-stitch look on the band, stitch Velcro loop tape by hand to the fabric on the back side of the band.
No-Sew: Along the finished top edge, iron another strip of Ultra Heat-n-Bond the entire length of the back side of the bed skirt. Peel the paper backing and attach the Velcro loop tape (OR you can simply use the sticky-back Velcro loop tape)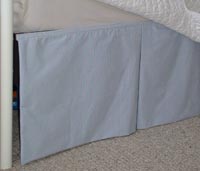
Step 4: Attach to Bedrail
Attach the Sticky-Back Velcro hook tape to the bedrail, pressing firmly for a secure bond.
Attach your bed skirt and enjoy the transformation!